Monday, 19 September 2011
Download, Install, and Change SBSettings Theme
If you are rocking a jailbroken iPhone, iPad, or iPod Touch, then you must have SBSettings installed on your device. If you are unaware, SBSettings app will allo you to control vital settings of your iOS device as easy as swiping your finger on the screen. However, the one thing I don’t care for in SBSettings is the application’s default theme. It’s pretty boring and ugly. But fortunately, just like the User Interface / springboard of the iOS, you will also be able to theme SBSettings with the help of Cydia. So if you want to theme your SBSettings, then just follow the step-by-step guide posted below:
Jailbreak iOS Device
Since SBSettings is available only in Cydia App Store, you must have a jailbroken iPhone or iPod Touch in order to access Cydia to install this great app. If you don’t have a jailbroken iOS device then you can follow our step-by-step guide to untether jailbreak iOS 4.2.1 on iPhone, iPod Touch or iPad using Redsn0w 0.9.7 orGreenpois0n RC5. Or if you rely on Ultrasn0w carrier unlock, you must jailbreak your iOS device using the recently released PwnageTool 4.2 for Mac OS X for iOS 4.2.1 and with PwnageTool bundle for iOS 4.3 orSn0wbreeze 2.2 and Sn0wbreeze 2.3 for iOS 4.3 on Windows.
How to Download SBSettings Themes
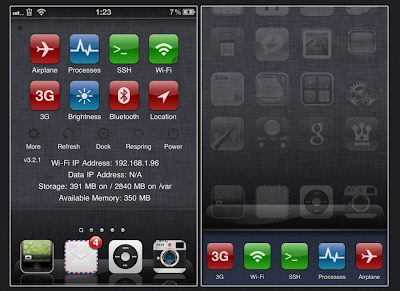
Step 1: Launch Cydia app on the Springboard of your iOS device then tap on Sections.
Step 2: Now Scroll down to themes and look for a section for “Themes (SBSettings)”. Browse through all the available SBSettings themes and install the theme you like for your device.
How to Change SBSettings Theme
Step 1: Now, launch SBSettings by swiping to the right or left on your top status bar. And then tap on “More” option.
Step 2: Then simply tap the “SBSettings Themes” option to see numerous default SBSettings themes and the theme you previously installed.
Step 3: You can also preview the theme you like by tapping the blue arrow.
Step 4: Tap on the theme that you prefer to install it.
Step 5: Then respring your device to activate the new SBSettings theme.
That’s it. You already themed your SBSettings. Enjoy!
Jailbreak iOS Device
Since SBSettings is available only in Cydia App Store, you must have a jailbroken iPhone or iPod Touch in order to access Cydia to install this great app. If you don’t have a jailbroken iOS device then you can follow our step-by-step guide to untether jailbreak iOS 4.2.1 on iPhone, iPod Touch or iPad using Redsn0w 0.9.7 orGreenpois0n RC5. Or if you rely on Ultrasn0w carrier unlock, you must jailbreak your iOS device using the recently released PwnageTool 4.2 for Mac OS X for iOS 4.2.1 and with PwnageTool bundle for iOS 4.3 orSn0wbreeze 2.2 and Sn0wbreeze 2.3 for iOS 4.3 on Windows.
How to Download SBSettings Themes
Step 1: Launch Cydia app on the Springboard of your iOS device then tap on Sections.
Step 2: Now Scroll down to themes and look for a section for “Themes (SBSettings)”. Browse through all the available SBSettings themes and install the theme you like for your device.
How to Change SBSettings Theme
Step 1: Now, launch SBSettings by swiping to the right or left on your top status bar. And then tap on “More” option.
Step 2: Then simply tap the “SBSettings Themes” option to see numerous default SBSettings themes and the theme you previously installed.
Step 3: You can also preview the theme you like by tapping the blue arrow.
Step 4: Tap on the theme that you prefer to install it.
Step 5: Then respring your device to activate the new SBSettings theme.
That’s it. You already themed your SBSettings. Enjoy!
Transfer Photos From USB Flash Drive To iPad
Do you want to transfer your photos from USB Flash Drive to iPad?
Now, It is possible with the help of the new iPad Camera Connection Kit.
This simple trick will allow you to you can fool your iPad into thinking a connected USB flash drive is a camera or SD card, this will allow you to transfer photos from the device to your 9.7 inch revolutionary tablet PC.
And this is definitely a best way to move photos to the iPad from a Mac that the iPad isn’t synced to. So if you want to transfer some of your photos to your iPad, then simply follow the simple instructions posted below:

How to Transfer Photos To iPad Using USB Flash Drive
Step 1: First, you have to connect the USB flash drive to your Mac
Step 2: Then create a folder in the root directory of the Flash Drive called “DCIM”
Step 3: Now, just simply drop the photos (any image format) you want to transfer from the USB key to the iPad into that DCIM directory
Step 4: Then plug the USB flash drive into your iPad via the Camera Connection Kit
That’s it. You can now access the photos from your iPad.
Now, It is possible with the help of the new iPad Camera Connection Kit.
This simple trick will allow you to you can fool your iPad into thinking a connected USB flash drive is a camera or SD card, this will allow you to transfer photos from the device to your 9.7 inch revolutionary tablet PC.
And this is definitely a best way to move photos to the iPad from a Mac that the iPad isn’t synced to. So if you want to transfer some of your photos to your iPad, then simply follow the simple instructions posted below:
How to Transfer Photos To iPad Using USB Flash Drive
Step 1: First, you have to connect the USB flash drive to your Mac
Step 2: Then create a folder in the root directory of the Flash Drive called “DCIM”
Step 3: Now, just simply drop the photos (any image format) you want to transfer from the USB key to the iPad into that DCIM directory
Step 4: Then plug the USB flash drive into your iPad via the Camera Connection Kit
That’s it. You can now access the photos from your iPad.
Master Google Android: 40 Tips and Tricks
Get Started--it's time for you to become a certified Android master.
The first time you use an Android phone, one thing becomes immediately clear: You're not in Cupertino anymore.
We've assembled 40 tips and tricks to help you make the most of your Android phone. Some are specific to Android 2.0 or later, but most apply to any Android-based device. And not one of these tricks requires you to jailbreak anything.
Android, as recent Verizon commercials remind us, is the antithesis of Apple's celebrated handset: It's open source, fully customizable, and free from unexplained app rejections. If the iPhone is Apple's inalterable masterpiece, the Android platform is Google's open canvas. The palette is in your hands; it's up to you to add color.
Optimize Your Home Screen
1. Make the most of your space by using widgets--dynamic programs that operate right on your home screen. Simply hold your finger on any open space, and then select Widgets from the pop-up menu. Widgets come in a huge variety of sizes and functions, so search the Android Market to find what works for you.


2. Prefer not to be bothered by a sound every time an e-mail arrives? Head into Gmail's Settings menu and set its ringtone toSilent. You'll still see new-message alerts in the notification panel at the top of your screen, and you can always pull the panel down to get detailed information. You can configure text messaging and other alert-generating apps the same way.
3. Set up one-touch dialing for the people you call the most. Hold your finger on an open space and select Shortcuts. Then, touchDirect dial and pick the person from your contact list. If one-touch texting is what you crave, use the Direct message option instead.
4. To drop your favorite Web pages onto your home screen, long-press on any site in your browser's bookmarks and then select the Add shortcut to home option.
5. Try using folders to keep your home screen organized. Long-press on a blank space and select Folders to create one. You can then drag and drop frequently used contacts, apps, or other shortcuts into it to cut down on clutter. To rename a folder, press and hold the folder's title bar while it's open.
Get Around Android
6. Make file management a snap with a utility such as Astro, which allows you to browse through your phone just as you would a computer, navigating directories and moving or deleting files at will.

7. Need to cut and paste text? Long-press on any text input area. If you're on a Web page, tap the Menu key and use the Select text option.
8. Use Android's hotkeys to do everything from zooming in to a Web page to opening a program. Check out our complete list ofAndroid keyboard shortcuts to learn them all.
9. You can set your own hotkeys to open apps, too. Head into the main Settings menu, select Applications, and then choose Quick Launch to get started.
10. If the on-screen keyboard pops up when you don't want it, touch it and swipe downward to make it disappear.
11. You can see the current date at any time by touching your finger to the top-left corner of the screen.
Stay Connected
12. To load files onto your Android phone, plug the handset into your PC and pull down the notification panel. Tap the USB connected box, and then tap Mount when the confirmation dialog box appears. Your phone will appear as a hard drive on your PC, and you can then drag and drop files as you wish.
13. Manage your music--and even import your iTunes playlists--with DoubleTwist, a free PC-based utility. The program's intuitive interface makes Motorola's Media Link offering look like a bloated relic.

14. Sync your Outlook calendar with your phone without the hassle. Install Google Calendar Sync and let it do the work for you.
15. To sync your Outlook contacts without using an Exchange server, try GO Contact Sync, an open-source utility for your PC.
16. Stay up to speed with your feeds with the help of NewsRob, a handy app that syncs your phone with your Google Reader account.
17. Want to have your PC's browser bookmarks on your Android phone? DownloadMyBookmarks from the Market to import them.
Power Up Your Phone
18. Get extra calling power by integrating Google Voice into your phone. Once you've signed up for an account, download the official app and watch your options expand. Bonus tip: Add the Google Voice widget to your home screen for one-touch toggling of your outgoing-call preferences.
19. You can send text messages for free through Google Voice--everything you need is in the app. Just make sure you change the settings to refresh every 5 minutes so that incoming messages won't be delayed. If you want faster notifications, log in to the Google Voice Website and configure your account to send you e-mail alerts when a new text arrives.

20. Get unbilled talk time by using Fring, a free mobile chat client for Android. Fring lets you make calls over Google Talk, Skype, and any SIP calling service.
21. Cut down on calling headaches by using the free Dial Zero app to call the companies you do business with. It lets you bypass annoying phone trees and get right to human representatives.
22. Keep annoying callers away by routing them directly to your voicemail. First, open the offending person's profile in your contacts list. Then, press the Menu button, tap Options, and check the Incoming calls box.
23. The Incoming Calls screen also holds the option for setting custom ringtones for callers. Tap Ringtone and change each person's tune as you wish.
24. Want to use your own MP3 files as ringtones? No problem: Make a new folder on your memory card and name it ringtones. Copy your MP3s there, and they will automatically show up in your selection list. Folders called alarms or notifications will do the same thing for those respective functions.
25. Check out the free app RingDroid. With it, you can easily edit an MP3 file to grab a precise segment of a song for a ringtone or system sound.

26. Android lets you keep multiple browser windows open at the same time. Long-press any Web link to open it in a new window. Tap the Menu key while in the browser to toggle between windows.
27. Prefer seeing Web pages in landscape mode? You can tell Android to always display sites that way. Select the Landscape-only display checkbox in the browser's Settings menu.
28. Android's built-in browser isn't your only option. Try Dolphin Browser for cool features such as tabbed browsing, gesture-driven commands, and multitouch zooming (yes, even on the Droid).
Secure Your Smartphone
29. Android includes an option to use simple patterns to secure your phone; to unlock the handset, you swipe your finger across the screen in a specific pattern. Look for Screen Unlock Pattern under 'Location and Security' in the main System Settings menu.
30. Want to back up your phone's data? Try MyBackup, which saves your apps, contacts, call logs, texts, and even settings to either your SD Card or a secure Internet server. You might also like SMS Backup, which periodically saves all of your texts into your Gmail account.
31. For even more protection, download Mobile Defense. The app allows you to use a PC to track your phone via GPS, remotely lock it, and then back up and wipe all of your data.
Add Essential Apps
32. If you handle a lot of Office files, Documents To Go may be just the thing for you. The free version gives you the ability to view Word and Excel files. The full paid version adds editing capabilities, along with PDF and PowerPoint viewing options.
33. Prefer working in the cloud? Get your hands on GDocs or ThinkFree Mobile Office, both of which make it a cinch to connect with your Google Docs documents.
34. If basic note-taking is all you need, download a PC-synced notepad such as GDocs Notepad With Sync. It saves documents directly into your Google Docs account for easy access.
35. For on-the-go photo editing, Adobe's Photoshop.com Mobileapp is tough to beat--and it's free, too.

36. Jazz up your Android music experience with TuneWiki, which automatically finds and scrolls lyrics next to your songs as they play. Plus, it gives you access to Internet radio streaming and some cool community-sharing features.
Customize Your Phone Completely
37. Adjust how your phone acts by using Locale. The app lets you set custom profiles for practically any circumstance--having your ringer shift to silent when you're at work, for example, or making your screen glow brighter at night.
38. Take full advantage of your phone's LED by installing Missed Call, which configures your phone's light to flash specific colors when calls from certain people slip by.
39. Edit Android's custom dictionary to include your name and other proper nouns. That way, they'll pop up in the auto-complete list as you type. Look under Language and keyboard settings in System Settings to get started.
40. If you try an Android app and decide that you don't like it, return it. The Android Market will give you a full refund for up to 24 hours after any purchase, provided that you haven't tried to return the same app before.
More Resources
Craving more Android info? Check out the following Android forums to connect with other owners.
How to make a shortcut icon of Shutdown and Restart.
Some Steps to Shutdown n Restart Your Computer Or Laptop.
To make shutdown button
right click your mouse>new
click on shutcut (dialog box will appear)
type shutdown -s -t 00
click on next and type the name Shutdown
click on finish
steps to make restart buttom
right click your mouse>new
click on shutcut (dialog box will appear)
type shutdown -r -t 00
click on next and type the name Restart
click on finish
Easy 5 Unique Ways To Get Backlinks For Your Site
Getting a ton of quality backlinks can take forever and most people just don’t have the time or patience to wait that long. There are many great ways to get backlinks such as; blog commenting, forum posting, article submissions, social bookmarking and guest posting, but the problem with these backlink building methods is that you will end up spending too much time away from your site and more importantly your readers. Wouldn’t it be nice if getting backlinks could be set on autopilot?
Great news, there is a way you can set your link building on autopilot that only requires you to do a minimal amount of upfront work. Before I get into the methods that will put your link building on autopilot I want to make sure you understand that this entire method revolves around good quality content.
Remember, “Content is king”!
1. Utilize Yahoo Answers
If you have been building backlinks to your site then I bet you know that Yahoo Answers is really a No-Follow site, right? Well to tell you the truth, it is, but that isn’t the reason you want to post answers on Yahoo Answers. The reason you need to post on Yahoo Answers is because there is a piece of software out there called WP Robot that when placed on a blog has a tool that pulls Yahoo Answers off Yahoo and places it on their site.
Do you get why this is beneficial for you?
Getting links is not that tough. All you have to do is answer questions that have a descriptive title such as, “How do I make money online?” or “How can I lower my car insurance premiums?”. The reason you need to answer questions with a large niche in the title such as making money online, insurance, weight loss or whatever is so you have more people pulling Answers from Yahoo onto their site.
2. Create A Multiple Series List
There are a few reasons to create a multiple series list and all three reasons combined work very well to get backlinks and traffic. The first reason multiple series lists work is because readers can follow along better with a list, they are just easier to scan and make learning less complicated. The other reason why multiple series lists get more backlinks is because people love to link to lists and the more lists you have the more backlinks you will get.
Example: If you write a 3 part series titled, “15 ways to get more traffic through Facebook” I would be a fool to only link to one part on my blog, so instead I would need to link to all three. I don’t know about you but I would much rather have three links pointing to my site as opposed to just one.
3. Add Information To Wikipedia
This is something I tested a while back and it works beautifully. Wikipedia is the biggest online encyclopedia and has over 3 million articles just in the English language. This is why finding a page to edit is very easy to do.
Here is how it works, you first need to find a page that can use some editing (I recommend finding a page that doesn’t have a lot of content but has a decent foundation to go off of). Once you have found the page you want to edit and that relates to your site you need to make sure that you have an identical topic on your site so that you have a reason to link to your site.
Example of identical topics: If you had a site about blogging then I great page to edit would be the page of Problogger, Darren Rowse(considering you had something new to add). Now in order to make it every more closely related I would try to get an interview with Darren that way I could fill in some missing parts to his Wikipedia page. After I have done that I can edit the page, insert my website link and wait.
Something that you must know is that like Yahoo Answers Wikipedia is a No Follow site so the entire point of using Wikipedia to get people to see the article on your site and link to that instead of the actual Wikipedia page.
4, Exchange Site Links For Content
Something that I have done quite a bit for my niche websites is exchange site links for written content. This isn’t guest posting, this method involves a site owner placing a link back to your site in order for you to write a specified number of articles.
The reason this works is because site owners want to get more content whether it is to submit to article directories, sell or just put on their site. I know this may not make a lot of sense to you now but it will. If you spend enough time on forums then you will notice that not everyone wants to buy content for a decent price, so all you have to do is tell the person wanting to buy the article that you will write 1 article each month in exchange for 1 link on their site. Trust me, people like to do this.
5. Give Away A Gift
My favorite way to get backlinks is to actually put out some link bait(AKA give away a gift). The link bait I always put out is a $25 gift card for Amazon.com. Everybody wants to get the free gift card so I tell my readers that all they have to do is link to my site and they will be entered into the drawing for the $25 gift card.
How I set it up: Since I want to get traffic and not only links I make the requirement that in order to be entered into the drawing the linking site needs to send at least 5 visitors having all different IP addresses and anything over 5 will count as another entry into the drawing. Think about it, if you only get 3 links from quality sites it would probably cost you around $200 per month for those links, but instead you only pay $25 with the hopes that the site owner keeps your link up for the chance to win another gift in the coming months.
The biggest different between these 5 unique link building methods and the normal link building methods is the fact that these are a more set and forget type thing while the others have to be catered to constantly.
Saturday, 17 September 2011
How To Reset Your Apple ID.
Here is an trick how you can reset your apple ID. So enjoy the following things steps by steps, and learn how to do.

In the early days of the iTunes Store, Apple was fairly lenient about your account name and password for the service. With the advent of the Apple ID and all of the moving parts it taps into, that’s all changed, with Cupertino requiring new users to create Apple IDs from their email addresses. If you’re looking for a new identity or just want to join the cool kids by using your email address too, read on.
While Apple makes it quite easy to change the password attached to your Apple ID, changing the account name itself is a bit more cloaked in mystery -- that is, unless you know where to look. Apple’s website features a single hub on their website for editing your Apple ID, so let’s have a look at this relatively pain-free process.
While Apple makes it quite easy to change the password attached to your Apple ID, changing the account name itself is a bit more cloaked in mystery -- that is, unless you know where to look. Apple’s website features a single hub on their website for editing your Apple ID, so let’s have a look at this relatively pain-free process.

Point your browser to the My Apple ID page of Apple’s website, which is where users can create an Apple ID or manage their current account. Click “Manage Your Account” to continue.

Now you’ll need to sign in with your existing Apple ID and password. You remember them, right?

Next you’ll see a variety of options for managing your Apple ID, including editing the email, physical addresses and phone numbers attached to it. On the right side of the screen you’ll see an “Apple ID” section with a blue “Edit” link -- click this to continue.

The current Apple ID will turn into an editable field where you can now type whatever new Apple ID you’d like to use. If you change your mind, hit the Cancel link to the right.

Otherwise, make your change and click the large blue “Save Changes” button at the bottom of the screen.

As long as no one else is using your chosen Apple ID (and if you’re using an email address, you should be free and clear), the changes will be recorded and you’ll see a friendly green checkmark with the words “Your changes have been saved” next to it. If you’re using a new email address, you may be asked to verify it with Apple -- just click the link in the email and you’ll be good to go.
That’s it! While you’re visiting My Apple ID, we recommend you have another look at your addresses, phone numbers, language and contact preferences, just to make sure they’re all up to date. Now wasn’t that easy?
That’s it! While you’re visiting My Apple ID, we recommend you have another look at your addresses, phone numbers, language and contact preferences, just to make sure they’re all up to date. Now wasn’t that easy?
Thursday, 15 September 2011
Use Inbuilt Microphone in Dell Inspiron Laptops / Notebooks
Start->Settings->Control panel->Sigmatel Audio: check "Allow reconfiguration popups "
And Can use microphone in your dell inspiron laptops/ Notebooks.
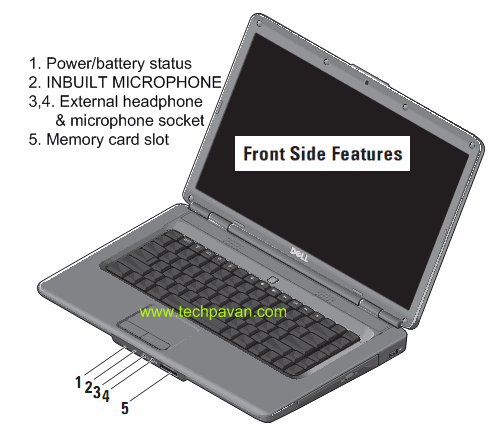
I use Dell Inspiron 1545 (almost same as 1525) with Microsoft Windows Vista and this tutorial is based on the same system configuration. But I hope the same/ similar way should work with other versions of Windows too. For those who don’t know about anything about the inbuilt microphone , Dell Inspiron laptops have an inbuilt microphone to facilitate you chatting / recording purposes. The figure below shows where exactly you find the mic on you Dell notebook.
- First, you need to have all your drivers installed.
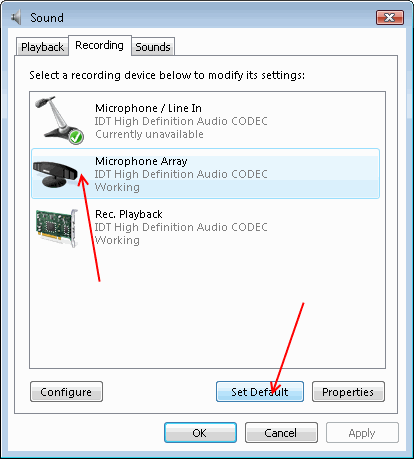
- Launch the sound control panel either from Control Panel (classic view) > Sound or right click on volume control in taskbar.
- Switch to Recording tab, click Microphone Array and click Set Default.
This will be in effect immediately without requiring any system restart.
Subscribe to:
Posts (Atom)


